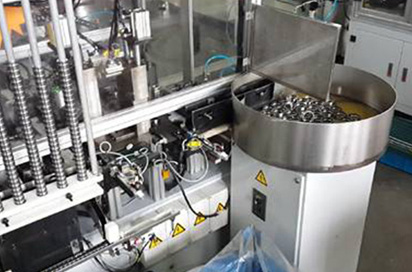
Bearing Ring Crack and Hardness Combination Flaw Detector TQJC-02
(2024年01月29日)https://www.bkneddy.com/eddy-current-testing-equipment/bearing-crack-hardness-flaw-detector.html
During the processing of bearing rings, various defects are often generated on the surface or inside, and cracks occupy a large proportion of all defects.
The cause of the cracks in the bearing rings is complicated. From the raw materials to the finished products of the ferrules, if the process is not proper, the cracks may be directly caused or the hidden cracks may be buried for the occurrence of the lap ring grinding cracks.
There are many ways to form cracks in bearing rings: Raw material defects include: cracks in raw materials and the effects of raw material defects on the grinding process.
Forging defects include forging cracks, effects of forged microstructure defects on the grinding process, and cutter cracks. There are also various heat treatment defects and the like. Therefore, crack detection and hardness testing are essential. As one of the experienced non destructive testing instruments manufacturers, BKN offers the perfect combination of Bearing Ring Crack and Hardness Combination testing equipment. Our advanced crack testing equipment enable accurate and efficient crack detection, ensuring the quality and integrity of forged components.
Bearing Ring Crack and Hardness Combination Flaw Detector TQJC-02 Brief Introduction
Detection process
Vibrating plate and string charging →hardness test→crack detection→automatic blanking
↓
Bad product sorting
Automatic charging —automatic detection—automatic sorting —automatic blanking
Bearing Ring Crack and Hardness Combination Flaw Detector TQJC-02.jpg
Charging mechanism
Bearing Ring-Crack and Hardness Combination Flaw Detector TQJC-02.jpg
Eddy Current Hardness testing
Bearing Ring Crack and Hardness-Combination Flaw Detector TQJC-02.jpg
Crack detection (the probe uses stainless steel casing+nano abrasion material ) to ensure long-term normal of the probe
Bearing Ring Crack and Hardness Combination-Flaw Detector TQJC-02.jpg
Discharging sequencing mechanism
Crack sensitivity: a crack with a depth of ≥0.05 mm and a length of ≥1 mm extending inward from the surface of the ferrule; for a crack that has not extended to the surface inside the ferrule, when the thickness between the subcutaneous surface and the surface of the workpiece is ≤0.2 mm, the depth is ≥0.20 mm Cracks of length ≥ 1 mm can be detected.
Hardness sensitivity: Rockwell 1HRC ~ 2HRC (other parameters remain stable and consistent).
- このできごとのURL:


コメント